Fabrication Summer Camp: Day 1
Welcome to summer camp! My name is Chris. For the next week, we will be making shapes with technology. We'll make them both virtually using code and physically using vinyl, paper, plastic, fabric, and paint. The technology we'll be using include computers, a vinyl cutter, a laser cutter, and a pen plotter. We provide these tools for you to use, but there are some tools that we expect you to supply. Each day we need you to bring your brains, of course, but also your eyes and hands. Don't try to borrow anybody else's. They won't fit you.
We've tried to design this camp so that it's more about you doing things with your brain and body than about listening to us talk. We are going to ask you to draw and be creative on demand. Some of you will say you're not an artist. Some of you will say you're not a math person or a code person. When you say these kinds of identity statements, what we hear is that you haven't had enough opportunities to explore the full range of your human abilities without fear of failure. To make this week a successful artistic, mathematical, and technological endeavor, you must simply use your eyes, hands, and brains in ways that match your experiences and interests.
Frankenshape
Speaking of body parts, let's make a Frankenshape, which is a shape that is made out of other shapes. Our exercise will have four stages: draw a prototype shape, measure the physical shape's properties, and program a digital version of the shape, and fabricate the shape using a vinyl cutter.
Drawing
The first stage of our challenge is to draw an interesting creature or object on your graph paper using only circles and rectangles. Here are the supplies we need:
- pencil
- graph paper
- marker
- ruler (optional)
Notice there's no computer on the list. In most of our activities, we will start with drawing. Our brain works better if our body is involved.
Center each circle and rectangle on a grid point. Ensure that the circles and rectangles form a single connected shape. If you were to cut the shape out, there would only be one piece. Here's my design, which is a popsicle: 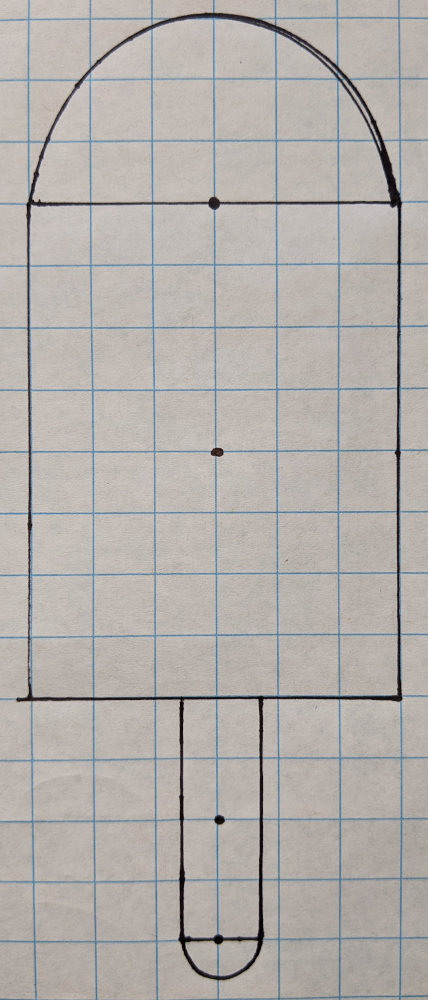 Only half the circles are drawn, but they are actually full circles. The shape's silhouette is what matters for the sticker.
Measuring
Soon you will turn your design into a computer program. The program will produce a file that we can feed into the pen plotter or a cutting tool. Before that can happen, we need to figure out some numbers. In particular, we need this information:
- The xy-coordinates of each shape's center.
- The radius of each circle.
- The width and height of each rectangle.
To determine the xy-coordinates of each shape, first designate some point on the grid to be the origin, the location (0, 0). I put the origin at the popsicle's center. The coordinates of each shape's centers are then measurements of how far away they are from the origin. Here's the popsicle with its coordinates and sizes marked:
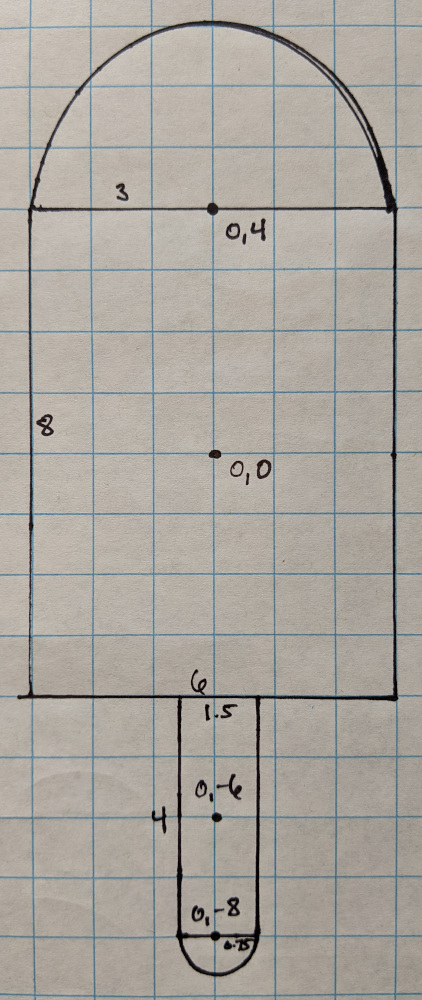
Measuring things is easier if you stick to the lines of the grid. However, as you can see, I veered off the grid with the popsicle stick. It would have been too wide if I hadn't.
Programming
With your measurements identified, you are now ready to use the computer. Open a web browser and direct yourself to Twoville. In the editor, you can draw a black circle by writing code like this:
Don't use my numbers. Use your numbers. Notice the indentation. Notice the punctuation. These typographical details matter. We call the symbols [ and ] square brackets.
To plot a second circle, we use a second circle block:
Plot a rectangle with code like this:
Notice that rectangles have a size property similar to the circle's radius property. Unlike radius, the size property must be set to a list of two numbers. One is the width and one is the height. Which one appears first in the list?
When I draw the rectangles and circles of my popsicle using the centers and sizes I wrote down on my graph paper, I end up with this design:
When I run this, the popsicle shows up very small in the bottom-left corner. That's because Twoville looks at the scene through a window whose bottom-left corner is at (0, 0) and whose dimensions are (100, 100). This window is only the default. We can alter it by setting properties of the view object:
We can even turn on a grid to help us identify locations:
After you get your shape made, we will fabricate it. You'll submit your shape to me by clicking on Send to Chris in the settings, I will load your shape into a vinyl cutter, and out will come a vinyl sticker.
Practice Exercise
Throughout the week we are going to investigate each big idea with three activities. First, I will demonstrate the idea with a design that I have made. Second, we will give you a design that you are to reverse engineer. Third, you will design and fabricate a shape of your own.
We are at the second stage right now. Reverse engineer this camel head:

The eye is just a white circle. We can subtract this away when we send it to the vinyl cutter.
Follow these steps in making your shape:
- Start by drawing on graph paper.
- Mark the vertex positions and measure the sizes on the graph paper.
- Get your design reviewed by a teacher to help you identify any issues.
- Code up your shape in Twoville.
Every activity will follow this draw-measure-review-code (DMRC) pattern. I have used computers enough to know that we do our worst thinking when we start at the computer.
Design Exercise
Once you finish the camel's head, you are ready to make your design. Follow the DMRC pattern. Be careful, though. Not just any frankenshape can be fabricated. The ring pieces on this Saturn are too brittle and will not stick well:

The pieces of this paw print don't have enough overlap and will tear off:

If your rectangle is rotated, add a rotate block:
Variables
Making is an iterative process. We try something and it doesn't feel right. Then we adjust it until it does. It's not that our first attempts are wrong; they are just steps or iterations on a design. With each iteration, we get more information that inspires us to make further changes or perhaps return to an earlier iteration. Coding is making and is also an iterative process. We write some code, inspect the output, and adjust the code. We're as wrong when we code as an artist is wrong at an easel or ball of clay.
Sometimes adjusting the code can become tedious. Suppose, for example, I have this program that subtracts away the corners of a square:
The circles are too big. They'll produce very sharp points that will not last long if I fabricate this. To make them smaller, I have to adjust four different numbers. That's not terrible, but it's not nothing either. Experimenting would be easier if I could just change the number in one place. I can do that by introducing a variable:
Polygon
Circles and rectangles are indispensible tools to have around, but they aren't enough to make all the interesting designs out there. Let's explore another design that requires a new kind of shape. Check out this bird head:

What shapes did I use to make this design? Two circles and a pentagon. Not a regular pentagon, but an irregular one like you and me. However, Twoville doesn't have a pentagon command. Nor triangle, hexagon, heptagon, octagon, or any of the others. The general name for a shape with straight edges that meet at corners or vertices is polygon. All the shapes I just mentioned are polygons, and so are stars and lightning bolts. To make any of these shapes, you use the polygon command.
Here's how I made the bird:
Practice Exercise
Practice with the polygon command by reversing engineering this diamond:

This shape has a lot of symmetry. Consider using variables. Follow the draw-measure-review-code sequence.
Design Exercise
Design a polygonal silhouette of your own. Follow the draw-measure-code-review sequence. We'll turn your design into a sticker or a cardstock cutout.