CS 145 Homework 0, Part 1
Follow these steps to create your class homework repository and get homework 0 up and running.
1. Create a Bitbucket account
In this class, all your code will be stored with the Bitbucket webservice. Using this third-party service has some nice benefits: they maintain a complete history of your source code using some software called Git, you can access your code from anywhere, their servers are very reliable, and most professionals use Git or something like it to manage projects. Most importantly, your instructor will be able to access your code at any time. You won’t need to email or print any thing to submit. If you have a question, don’t “overshare” your code on Piazza. Just ask your instructor to have a look at Bitbucket.
Visit Bitbucket and create a new account. Pick whatever username you’d like (as you begin your professional career), but be sure to provide your real name so that your instructor can figure out who you are. You will need to remember your password, as you are likely to need it again soon.
2. Fork template repository
Next you will create a repository to hold all your code for CS 145. Bitbucket allows you to make many repositories, one for each project you work on. In this class, you will stick with one for the entire semester.
Your instructor has already created a template repository on Bitbucket. Your repository will be what Bitbucket calls a fork of this template repository. If your instructor adds or edits files in the template repository, you will be able to synchronize your fork with the template easily.
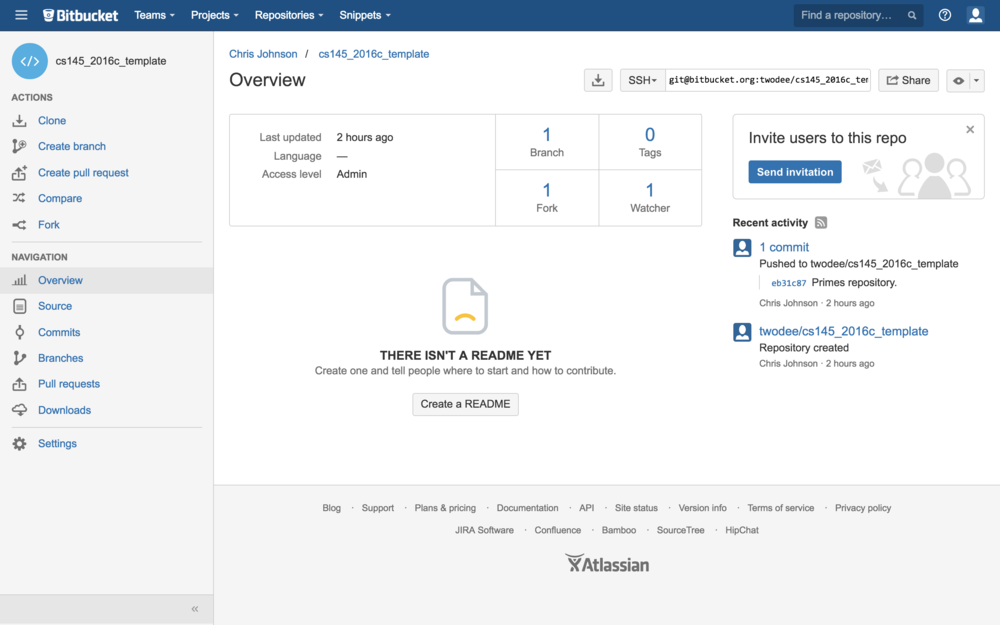
Find the template repository repository at https://bitbucket.org/twodee/cs145_2016c_template. You should see a page that looks like this:
Click on Source in the left navigation panel. You see a few files and directories. The src directory is where your code will eventually go. The readonly directory is where your instructor has placed all the homework writeups and graders. You should never modify, add, or delete files in readonly. Only you will suffer if you do.
In the left navigation panel, click on Fork to create your own repository based on this template. On the page that appears, expand Advanced Settings to see a screen that looks like this:
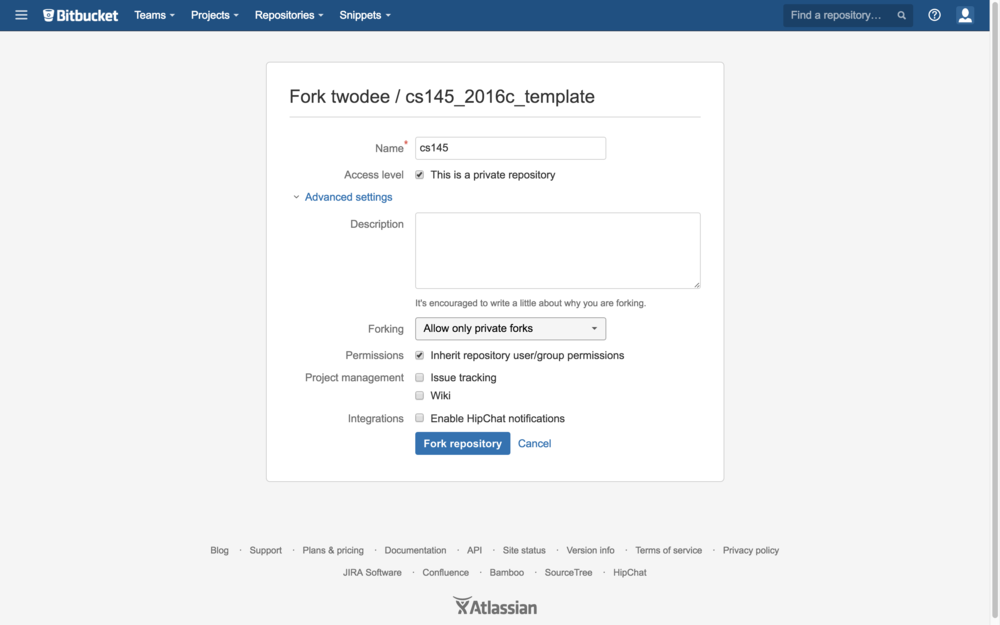
You can name your fork whatever you want—perhaps cs145. There are two other things that you must get exactly right:
- Check This is a private repository.
- Check Inherit repository user/group permissions.
The other settings can be left at their default values. Click Fork repository to continue.
Click on Source in your repository. You should see the exact same files that were in the template. But these are your copies.
Return to your repository’s main page by clicking on Overview. Copy the https://username@bitbucket.org/username/myrepo.git URL on the top-right. You will need this in the next step.
3. Clone your repository
You are done with Bitbucket in your web browser for a while. In fact, you will only rarely need to visit Bitbucket’s web page, as most of your time will be spent in Eclipse, which can synchronize your files with Bitbucket directly. Go ahead and open Eclipse. Click Workbench to leave the welcome screen. Close the Task List and Outline windows to decomplicate the interface.
So far your repository is only on Bitbucket’s servers. To add new files to it, you have to clone it on your local machine. Bitbucket holds onto your remote repository, while your clone is a mirror image of it on your local machine. After you finish making changes to the local mirror, you will send them up to the remote repository.
In Eclipse, select File / Import / Git / Projects from Git. Select Clone URI. Paste your Bitbucket URL in the URI field. Hit Next. You’ll see a box with master selected. Leave it selected and hit Next. You are asked to decide where to place the clone on your local machine. The default location is fine, just make note of it should you need to access it later. Hit Next.
You are shown a wizard for importing projects. As your repository already contains an Eclipse project, check Import existing Eclipse projects and hit Next. On the next screen hit Finish.
4. Complete homework 0
In the Package Explorer on the left, expand your project and the readonly directory. Double-click on hw0.pdf. If your machine is set up nicely and has a PDF reader installed, the homework 0 specification appears. If not, you can find the homework specification on the course website or via your remote repository on Bitbucket.
Read the specification before proceeding further.
4.1. SpecChecker
Learning goes something like this:
- You do something.
- You receive feedback.
Your instructor doesn’t want you to spend a lot of time in stage 1 and only a little time in stage 2. So, he has provided a tool called a SpecChecker that you can run as often as you want to see how well you are meeting the homework requirements. This tool isn’t designed to fix your problems for you—only to make you aware of them. You will still have to think.
To run the SpecChecker for homework 0, right-click (or control-click) on specchecker_hw0.jar in the readonly directory. Select Build Path / Add to Build Path. It reappears under Referenced Libraries. In either location, right-click on it and select Run As / Java Application.
You should receive a message a message about something called JUnit not being found. You need to add this JUnit library of code for the SpecChecker to work. Right-click on your project and select Build Path / Add Libraries / JUnit and hit Finish.
Run the SpecChecker again. Now you should see output that includes the following text:
PROBLEM:
A class by the name of hw0.Greeter could not be found. Check
case, spelling, and that you created your class in the right
package.
The SpecChecker is telling us that it can’t find a class that was required for the homework. If you want the 0 Blugolds that this assignment is worth, you’d better add it.
4.2. Create a Package
Note that the PDF and SpecChecker say that the Greeter class must be in package hw0. Right-click on the src directory just inside your project and select New / Package. Enter hw0 as the package’s name.
Packages can be thought of as directories. You will use them to organize your code for this class. Each homework will go in its own package.
4.3. Create a Class
With the directory in place, let’s add the Greeter class. Right-click on the hw0 package and select New / Class. Enter Greeter as the name. The file Greeter.java is placed inside the hw0 package and opened for editing. It contains the following text:
package hw0;

public class Greeter {

}
Run the SpecChecker again. You should see this output:
PROBLEM:
You need a main method in class hw0.Greeter taking 1 argument,
having type String[].
4.4. Create Main
Though you have the required class, you do not have the required main method in that class. Let’s add it. Place your cursor so its on the blank line between the curly braces. Hit tab to indent one level. Clear indentation makes it easier to understand how your code is nested. If you want to get good at this stuff, pay attention to small details like this.
Now type the word main and hit Control-Space. Select main - main method and a main method is inserted into your class:
package hw0;

public class Greeter {
  public static void main(String[] args) {

  }
}
Run the SpecChecker again. You should see this output:
PROBLEM:
When running Greeter.main, I did not see the expected output.
expected:<[Goodbye, Pluto!
]> but was:<[]>
4.5. Failure
The SpecChecker captures the output of your program and compares it to the expected output. Since your program had not output, it certainly did not match. Add a print statement, but having it print Goodbye, Pluto... :( instead. Run your class by clicking on the green and white Play button in the Eclipse toolbar. You should see your output in the console window.
But now run the SpecChecker again. You see the following output this time:
PROBLEM:
When running Greeter.main, I did not see the expected output.
expected:<Goodbye, Pluto[!]
> but was:<Goodbye, Pluto[... :(]
>
The square brackets highlight the differences. They are not actually part of the text, which can get really confusing when you actually do have square brackets in the text.
4.6. Success
Fix your print statement so it does the right thing. Test it apart from the SpecChecker so that you understand the behavior of your own code. If you treat the SpecChecker like a crutch, it will break your legs and you will never walk again. When you like the result, run the SpecChecker to verify that everything’s okay. You should see the following output:
High five. You have passed all tests. Now commit and push before
the deadline.
Your code works! But you’re not done yet. You still need to get your code up to Bitbucket so your instructor can grade it.
5. Add Changes
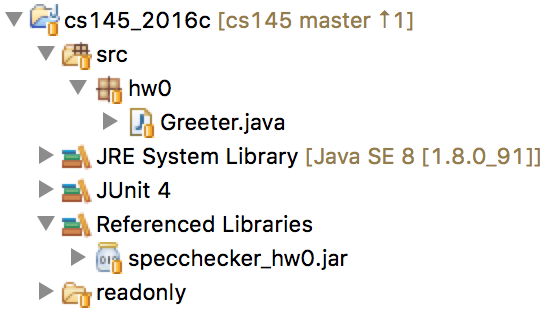
Have a look at the Package Explorer. You should see something like this:

The icons you see on these files are meaningful. The little yellow cylinders indicate files that also live in the remote repository on Bitbucket. But notice that Greeter.java and hw0 have question mark icons instead. These are known only locally. Technically, they don’t even exist in your local mirror, only in your working directory. You must add them.
You often want to bundle a set of related changes together, even if they occur across multiple files. Git provides a staging area or index where you can accumulate up your changes. To get your new files into this staging area, right-click on Greeter.java and select Team / Add to Index. The icons change:

The readonly directory has been collapsed, because you won’t need to get inside of it anymore.
The green plus sign indicates that Greeter.java is in the index but is not yet in your local mirror.
6. Commit
To move files that have been added to the staging area into the local mirror, you must commit them. Right-click on your project and select Team / Commit. A window pops up showing the staged files in the Staged Changes list.
You’ll also see in Unstaged Changes files that have been added or modified but not staged—like file .classpath, which was edited when you added JUnit and the SpecChecker to the build path. Right-click on .classpath and select Add to Index.
Under Commit Message, write a short but meaningful description of the changes you are commiting—like Obliterated homework 0.
Click Commit and closing the Git Staging Area. The icons have changed once again:
All the files have yellow cylinder icons, meaning that they are all now in the local mirror.
7. Push
But the local mirror is not synchronized with the remote repository on Bitbucket. You can tell this by looking to the right of the project name in the Package Explorer. See that up arrow with the number 1? That means the local mirror is 1 commit past the remote repository—it has 1 commit that Bitbucket does not. Before you can say you’ve fully obliterated homework 0, you must push your commits to local mirror up to Bitbucket.
Right-click on your project and select Team / Push to Upstream. Hit Okay at the message window that pops up.
In the future, feel free to combine this step and the previous by clicking the Commit and Push button that you saw in the Git Staging Area.
8. Verify
Your last step is to verify that the push succeeded. Visit your repository in the web browser. Click on Source and navigate to Greeter.java. If you can see it on Bitbucket’s web page, then so can your instructor—assuming you set up permissions correctly.
If you only ever use one machine, and neither you nor your instructor ever makes mistakes, this is really all you need to know to use Bitbucket and Git this semester!